For best results, view these instructions on a separate browser while bringing up the FlicBoard on a phone or tablet. In this way the various gestures can be tried while reading along. Also note that a free game, FlicInvaders , is available in the Play Store to make learning the FlicBoard gestures much easier.
Once installed and enabled, you can activate the FlicBoard, by tapping on a text entry area like with any android keyboard. A gesture table then appears in the bottom half of the screen (where the conventional button keyboard would have been):
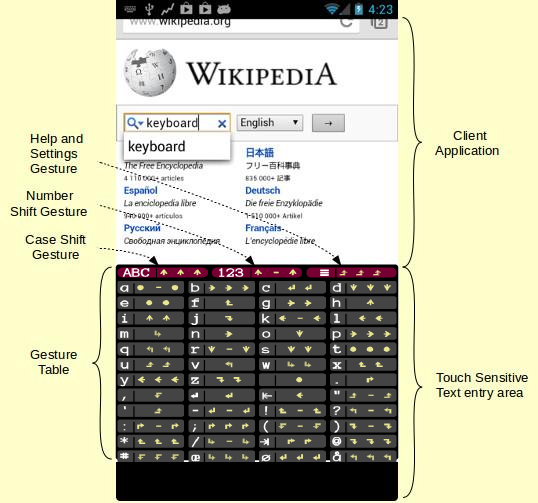
Figure 1. The FlicBoard Gesture Table.
 |
Tap: The finger comes up close to the same place it went down. |
| Swipe: A swipe in the direction indicated. Up is the direction the fingers are normally pointing. | |
 |
Curved Swipe: A swipe starting in one of the four directions and ending in another. |
Table 1
All swipes are either along or perpendicular to the direction your
fingers are pointing. In the following text,
up, and the symbol,
![]() , correspond to the direction the fingers are currently
pointing. If the hand orientation is changed, or if a another person
uses the app, a calibration gesture can be used to calibrate the
system. Initially, it assumes an average size hand coming from the
lower right of the screen as shown in the video below.
, correspond to the direction the fingers are currently
pointing. If the hand orientation is changed, or if a another person
uses the app, a calibration gesture can be used to calibrate the
system. Initially, it assumes an average size hand coming from the
lower right of the screen as shown in the video below.
Calibration
A quick calibration can be done, at any time, by simultaneously swiping all three fingers in the up direction and then, without lifting, swiping them back down to their original position. If this is done correctly, you will see a popup window as an acknowledgement. When doing this, take care to bring the fingers down with the same spacing you will be using when entering the gestures. The following clip shows a calibration gesture being done:
Video 1. The Calibration Gesture
Entering Characters
The Gesture Table: Besides
providing a place to enter gestures, the active area can also display
(under your fingers) a table showing how to form them. Various
versions of this table are available by doing a long swipe to the left
or right. There are four possible tables:
- QWERTY table: This table first appears as the default and
is laid out similar to a conventional keyboard. If you're already
familiar with the qwerty keyboard, this can aid your eye in finding
a character.
- Normal table: In this table the characters are displayed in
alphabetical order in simple rows.
- Word fragments table: This table lists the gestures for a
number of common word fragments such as "th", "and", "ing", etc,
which can enhance your typing speed.
- Transparent table: This table is transparent allowing you
to see parts of the application you are using that lie under the
table. This can be useful once you've learned most of the gestures.
In these tables each character or shift is paired with a group of from one to three symbols that show how to make the gesture. The symbols are those used in Table 1 along with the dash symbol, "-", which indicates that the corresponding finger remains lifted and does not touch the screen.
The Shift Gestures: The three maroon entries at the top of
each table have special functions. The left one is the case shift
gesture, ![]() ,
the middle is the number shift,
,
the middle is the number shift, ![]() , and the right one brings up the
help/settings menu,
, and the right one brings up the
help/settings menu, ![]() . When either a number or case shift gesture is entered,
the rest of the table changes to show the characters available in the
new shifted state. At the same time the table entry for the shift
changes from maroon to green and shows the gesture needed to return to
the un-shifted state,
. When either a number or case shift gesture is entered,
the rest of the table changes to show the characters available in the
new shifted state. At the same time the table entry for the shift
changes from maroon to green and shows the gesture needed to return to
the un-shifted state, ![]() . If only one shift gesture is made the effect is
momentary, i.e. only the next gesture will be interpreted as shifted.
If two shift gestures are made in a row, it goes into a shift lock
state and the shift table entry turns red,
. If only one shift gesture is made the effect is
momentary, i.e. only the next gesture will be interpreted as shifted.
If two shift gestures are made in a row, it goes into a shift lock
state and the shift table entry turns red, ![]() , again showing the gesture to
return back to the un-shifted state.
, again showing the gesture to
return back to the un-shifted state.
Letters and Punctuation: The rest of each table is for letters, punctuation, and editing. For example a space is a simple one finger tap and a backspace is a single finger swipe to the left. To enter an "s",
The minimum amount you need to move your finger for it to be recognized as a swipe (as opposed to a tap) can be changed using the "Sensitivity" parameter in the settings. With a high sensitivity setting, the fingers need only move a small amount for a swipe to be detected so text entry can be very fast. This, however, requires finer movements and more practice. It's probably a good idea to start with the default sensitivity. If your taps are sometimes being interpreted as swipes to can reduce the sensitivity.
The gesture used for each character was chosen according to the character's frequency of use in English. For example, the most frequently used characters: the space, "e","a", and "t", were assigned to the simplest tapping gestures.
Word Fragment Gestures
In order to facilitate fast typing the FlicBoard also recognizes a
set of gestures that enter common groups of letters like: "and",
"the", and "ou". To see these gestures, make a long swipe to the left
or right with one finger until you see the appropriate table. These
gestures, like the calibration gesture, involve a swipe in one
direction and then, without lifting, a swipe back to the original
position. The most useful fragments are: "and", "th", "the", "I", "ou"
and "ing".
Auto-Repeat
Like other keyboards the FlicBoard also has an
auto-repeat feature. If a gesture is made and the fingers are held
down for more than about 2 seconds, the character will start repeating
until the fingers are lifted. This is especially useful with the
backspace gesture. This feature can be switched on or off in the
help/settings menu. As mentioned above, the help/settings menu can be
reached using the settings/help gesture, ![]() , or by running the FlicBoard
app.
, or by running the FlicBoard
app.
The following is a short list of tips that have been
found useful:
| Easy does it! | The FlicBoard works best with quick gentle taps. This is especially true in cars and trains where the phone can be a moving target. |
| Keep the screen clean | Many things are picked up on the hands and screen and can accumulate causing occasional errors. Keeping your hands clean and wiping the screen with a cloth or piece of clothing is usually sufficient. |
| Arrow key repeat | When navigating many screens, the
cursor keys can be very useful when used with the "quick
repeat" (described above. The cursor keys are in the
numbers lock table (two |
| Use index and middle fingers |
The index and middle fingers are more dexterous
and are the best choice for all of the one and two
finger gestures. This also leaves the ring finger free for
tapping spaces which are used frequently. |